2017年5月25日 星期四
node.js 用 npm 指令 更新支援 Angular 4
先進去工作目錄,例如:c:\htdoc\sas
把 angular 4 檔案放進來,在 c:\htdoc\sas 下面執行指令:
c:\htdoc\sas>npm install
On Linux/Mac:
c:\htdoc\sas>
npm install @angular/{common,compiler,compiler-cli,core,forms,http,platform-browser,platform-browser-dynamic,platform-server,router,animations}@latest typescript@latest --save
On Windows:
c:\htdoc\sas>
npm install @angular/common@latest @angular/compiler@latest @angular/compiler-cli@latest @angular/core@latest @angular/forms@latest @angular/http@latest @angular/platform-browser@latest @angular/platform-browser-dynamic@latest @angular/platform-server@latest @angular/router@latest @angular/animations@latest typescript@latest --save
會出現 typescript 無法更新到 2.3.3 ,改用下列指令就可以。
Installing typescript
For the latest stable version:(最後穩定的版本)
c:\htdoc\sas>npm install -g tslint typescript

2017年5月24日 星期三
CentOS 7 安裝 Docker 容器
資訊來源:https://www.openfoundry.org/tw/enterprise-application/9349-centos7
Docker套件的安裝與使用
CentOS 7.0採用了以Linux Containers技術為基礎的輕量級Docker虛擬化應用。它與許多新手IT所熟悉的虛擬機器(Virtual Machine)是不一樣的。一般的虛擬機器都有各自的虛擬化電腦硬體,來安裝與使用各自獨立的客端作業系統(Guest OS),這種作法相當耗用實體的硬體資源,但其優點是容易部署各式各樣的作業系統,包括了像是Windows、Mac、Linux、FreeBSD等等。
至於Docker容器(Container)運作的概念,則是共用一個主體的作業系統核心,然後分隔出各自獨立的運行空間,就好像一位房東將一棟房子重新裝潢後,分隔出多間的小套房來出租一樣,雖然都是在同一棟房子之中,但各自的空間卻可以自行擺設所需要的東西。採用這種容器虛擬化技術的優點,就在於可節省掉許多硬體資源,但缺點就是這一些分支出去的容器,只能夠使用相同的作業系統核心,簡單來說就是您無法在CentOS 7.0的Docker虛擬化環境中,建立與使用Windows、Mac等不屬於Linux核心的容器。
關於在CentOS 7.0下安裝Docker服務的方法,只要像如圖下達sudo yum install docker即可。目前最新的版本為1.3.2。

▲圖 安裝docker套件
完成docker套件的安裝之後,請下達systemctl start docker命令來啟動它即可。至於如果希望每一次CentOS系統啟動時自動執行,請如圖50所示下達systemctl enable docker命令。
啟用docker服務
對於目前執行中的docker完整版本資訊檢視,請如圖51所示下達docker version即可,其內容包括了用戶端版本、用戶端API版本、伺服端版本、伺服端API版本等資訊
查看docker版本資訊
確認docker服務正在執行之中,便可以開始來下載與安裝所需要的容器映像檔,以取得最新版本的CentOS映象檔來說,只要下達sudo docker pull centos即可,如果是Ubuntu Linux的映象檔,請如圖52所示下達sudo docker pull ubuntu命令。如果Fedoa Linux映象檔,則可以下達sudo docker pull fedora。
安裝映像檔
關於映象檔的下載安裝,您可以先行線上的搜尋結果後,再來決定所要安裝的映象檔名稱。以Ubuntu Linux系列的映象檔來說,您就可以下達docker search ubuntu,便可以像如圖53所示一樣,找到所有以Ubuntu系列為主的Linux映象檔。其中凡是有標示為Official與Trusted字眼的映象檔,皆是您最佳的選擇。
搜尋Ubuntu系列映像檔
如果您想要知道目前已下載安裝的映象檔有哪一些,只要下達docker images命令即可,範例中便可以看到目前有關Ubuntu的映象檔共有五個,而Fedora則有兩個。進一步您可以下達docker info命令,來得知目前Docker中容器的數量、映象檔數量、集區的區塊配置大小、資料檔位置、中繼資料檔位置、資料已使用的空間大小、資料可用的總空間大小、中繼資料已使用的空間大小、中繼資料可用的總空間大小、程式庫版本資訊、Linux核心的版本資訊以及目前的CentOS版本資訊等等。
查看目前映像檔資訊
接下來您可以嘗試在某一指定的容器中執行命令,例如您可以下達docker run Ubuntu:latest ls –l命令,便可以像如圖55所示一樣,檢視到目前Ubuntu容器中的目錄清單。另一個例子是執行docker run centos:latest cat /etc/centos-release,便可以察看到目前這個CentOS容器的系統版本資訊。
執行docker命令
當您想要知道在目前的Docker服務之中執行過了哪一些命令,只要像如圖56所示一樣下達docker ps –a命令,即可查詢到曾經在哪一個容器之中執行過什麼命令參數。
查看docker執行過的命令
我們除了能夠將Docker指定的命令參數,執行在某一個容器的終端機命令列之中,也可以選擇先進入到該容器之後,再對於該容器中的Linux系統進行管理。如圖57所示筆者以docker run -i –t ubuntu:latest /bin/bash來進入到此容器的終端機提示列下,然後下達lsb_release –a命令參數來查看目前所在容器的系統版本資訊。另外在此還可以看到每一個container都有一個唯一的ID,來顯示在root@字元提示之後。若是想要離開目前的容器,只要下達exit命令或是按下Ctrl+D按鍵即可。
進入容器終端機
既然我們可以使用Docker的命令來進入到任一個容器的作業系統之中,那麼肯定也可以執行許多該系統所提供的命令工具,或是在該系統之中安裝各類軟體套件。如此一來不就可以讓不同的伺服器服務分散運作在不同的容器之中。如圖58所示便是筆者下達一個最常用的ifconfig命令,來查看目前這個容器系統的預設IP位址配置。
查看容器網路配置
接下來就讓我們來嘗試在這個Ubuntu Linux的容器之中,下載安裝一個Apache2的網站服務套件吧。請如圖59所示下達apt-get install apache2即可。
在容器中安裝Apache2套件
成功完成Apache2套件的安裝之後,便可以先下達service apache2 status來查看此網站服務的執行狀態,如果尚未啟動就請下達service apache2 start來執行它即可。
啟動容器的網站服務
成功安裝與啟動Ubuntu Linux的Apache網站服務之後,我們便可以回到CentOS主機的桌面中,開啟瀏覽器來嘗試連線此容器的網站服務。如圖61所示便是Apache2 Ubuntu網站服務預設的首頁。
連線容器的Apache網站
關於CentOS 7.0於虛擬化平台的部署,您除了可以選擇將它安裝在以KVM、VirtualBox、Xen、XenServer以及VMware為主的相關虛擬機器之外,同樣也可以將它安裝在Windows Server 2012 R2、Windows 8.1企業版(專業版)或是免費的Hyper-v 2012 R2的Hyper-v虛擬機器之中。如圖所示便是一個CentOS 7.0虛擬機器,正運行於Hyper-v 3.0 R2平台的範例,由於它已支援Hyper-v的動態記憶體配置技術,因此可讓整體資源的使用率最大化。
將CentOS部署在Hyper-v
Docker套件的安裝與使用
CentOS 7.0採用了以Linux Containers技術為基礎的輕量級Docker虛擬化應用。它與許多新手IT所熟悉的虛擬機器(Virtual Machine)是不一樣的。一般的虛擬機器都有各自的虛擬化電腦硬體,來安裝與使用各自獨立的客端作業系統(Guest OS),這種作法相當耗用實體的硬體資源,但其優點是容易部署各式各樣的作業系統,包括了像是Windows、Mac、Linux、FreeBSD等等。
至於Docker容器(Container)運作的概念,則是共用一個主體的作業系統核心,然後分隔出各自獨立的運行空間,就好像一位房東將一棟房子重新裝潢後,分隔出多間的小套房來出租一樣,雖然都是在同一棟房子之中,但各自的空間卻可以自行擺設所需要的東西。採用這種容器虛擬化技術的優點,就在於可節省掉許多硬體資源,但缺點就是這一些分支出去的容器,只能夠使用相同的作業系統核心,簡單來說就是您無法在CentOS 7.0的Docker虛擬化環境中,建立與使用Windows、Mac等不屬於Linux核心的容器。
關於在CentOS 7.0下安裝Docker服務的方法,只要像如圖下達sudo yum install docker即可。目前最新的版本為1.3.2。

▲圖 安裝docker套件
完成docker套件的安裝之後,請下達systemctl start docker命令來啟動它即可。至於如果希望每一次CentOS系統啟動時自動執行,請如圖50所示下達systemctl enable docker命令。
啟用docker服務
對於目前執行中的docker完整版本資訊檢視,請如圖51所示下達docker version即可,其內容包括了用戶端版本、用戶端API版本、伺服端版本、伺服端API版本等資訊
查看docker版本資訊
確認docker服務正在執行之中,便可以開始來下載與安裝所需要的容器映像檔,以取得最新版本的CentOS映象檔來說,只要下達sudo docker pull centos即可,如果是Ubuntu Linux的映象檔,請如圖52所示下達sudo docker pull ubuntu命令。如果Fedoa Linux映象檔,則可以下達sudo docker pull fedora。
安裝映像檔
關於映象檔的下載安裝,您可以先行線上的搜尋結果後,再來決定所要安裝的映象檔名稱。以Ubuntu Linux系列的映象檔來說,您就可以下達docker search ubuntu,便可以像如圖53所示一樣,找到所有以Ubuntu系列為主的Linux映象檔。其中凡是有標示為Official與Trusted字眼的映象檔,皆是您最佳的選擇。
搜尋Ubuntu系列映像檔
如果您想要知道目前已下載安裝的映象檔有哪一些,只要下達docker images命令即可,範例中便可以看到目前有關Ubuntu的映象檔共有五個,而Fedora則有兩個。進一步您可以下達docker info命令,來得知目前Docker中容器的數量、映象檔數量、集區的區塊配置大小、資料檔位置、中繼資料檔位置、資料已使用的空間大小、資料可用的總空間大小、中繼資料已使用的空間大小、中繼資料可用的總空間大小、程式庫版本資訊、Linux核心的版本資訊以及目前的CentOS版本資訊等等。
查看目前映像檔資訊
接下來您可以嘗試在某一指定的容器中執行命令,例如您可以下達docker run Ubuntu:latest ls –l命令,便可以像如圖55所示一樣,檢視到目前Ubuntu容器中的目錄清單。另一個例子是執行docker run centos:latest cat /etc/centos-release,便可以察看到目前這個CentOS容器的系統版本資訊。
執行docker命令
當您想要知道在目前的Docker服務之中執行過了哪一些命令,只要像如圖56所示一樣下達docker ps –a命令,即可查詢到曾經在哪一個容器之中執行過什麼命令參數。
查看docker執行過的命令
我們除了能夠將Docker指定的命令參數,執行在某一個容器的終端機命令列之中,也可以選擇先進入到該容器之後,再對於該容器中的Linux系統進行管理。如圖57所示筆者以docker run -i –t ubuntu:latest /bin/bash來進入到此容器的終端機提示列下,然後下達lsb_release –a命令參數來查看目前所在容器的系統版本資訊。另外在此還可以看到每一個container都有一個唯一的ID,來顯示在root@字元提示之後。若是想要離開目前的容器,只要下達exit命令或是按下Ctrl+D按鍵即可。
進入容器終端機
既然我們可以使用Docker的命令來進入到任一個容器的作業系統之中,那麼肯定也可以執行許多該系統所提供的命令工具,或是在該系統之中安裝各類軟體套件。如此一來不就可以讓不同的伺服器服務分散運作在不同的容器之中。如圖58所示便是筆者下達一個最常用的ifconfig命令,來查看目前這個容器系統的預設IP位址配置。
查看容器網路配置
接下來就讓我們來嘗試在這個Ubuntu Linux的容器之中,下載安裝一個Apache2的網站服務套件吧。請如圖59所示下達apt-get install apache2即可。
在容器中安裝Apache2套件
成功完成Apache2套件的安裝之後,便可以先下達service apache2 status來查看此網站服務的執行狀態,如果尚未啟動就請下達service apache2 start來執行它即可。
啟動容器的網站服務
成功安裝與啟動Ubuntu Linux的Apache網站服務之後,我們便可以回到CentOS主機的桌面中,開啟瀏覽器來嘗試連線此容器的網站服務。如圖61所示便是Apache2 Ubuntu網站服務預設的首頁。
連線容器的Apache網站
關於CentOS 7.0於虛擬化平台的部署,您除了可以選擇將它安裝在以KVM、VirtualBox、Xen、XenServer以及VMware為主的相關虛擬機器之外,同樣也可以將它安裝在Windows Server 2012 R2、Windows 8.1企業版(專業版)或是免費的Hyper-v 2012 R2的Hyper-v虛擬機器之中。如圖所示便是一個CentOS 7.0虛擬機器,正運行於Hyper-v 3.0 R2平台的範例,由於它已支援Hyper-v的動態記憶體配置技術,因此可讓整體資源的使用率最大化。
將CentOS部署在Hyper-v
CentOS 7 常用指令
加入帳號到群組
在 Linux 要加入帳號到現有群組,可以用 useradd 及 usermod 指令實現。useradd 在建立帳號時修改預設值,可以將帳號加到現有群組;而 usermod 就可以用作修改帳號設定,其中一樣是加入帳號加到現有群組。Linux 的群組分別有 Primary group (主要群組)及 Secondary group (額外群組)。
useradd 新增帳號時加入到現有群組,只要在 useradd 加上 -G [group-name] 就可以,例如我建立一個帳號為 phpini, 並加入 devgroup 群組,指令是這樣:
如果 getgroup 不存在,先用 groupadd 建立:
# groupadd gitgroup
然後可以用 useradd 建立帳號:
# useradd -G gitgroup wengxxxxx
如果想將帳號 wengxxxxx 的 Primary group 改為 gitgroup, 只要將 -G 改成 -g
# useradd -g gitgroup wengxxxxx
usermod 的用法跟 useradd 差不多,主要分別是 usermod 是變更帳號現有的設定,將現有帳號加入現有群組。例如將 wengxxxxx 加入 getgroup 群組,指令是這樣:
# usermod -a -G gitgroup wengxxxxx
以下是變更 wengxxxxx 帳號的 Primary group 到 gitproup
# usermod -G gitgroup wengxxxxx
========================================================================
完成docker套件的安裝之後
請下達 # systemctl start docker 命令來啟動它即可。
至於如果希望每一次CentOS系統啟動時自動執行,
請下達# systemctl enable docker 命令。
========================================================================
下面資料來源:http://linux.vbird.org/linux_basic/0210filepermission.php
如何改變檔案屬性與權限
我們現在知道檔案權限對於一個系統的安全重要性了,也知道檔案的權限對於使用者與群組的相關性, 那麼如何修改一個檔案的屬性與權限呢?又!有多少檔案的權限我們可以修改呢? 其實一個檔案的屬性與權限有很多!我們先介紹幾個常用於群組、擁有者、各種身份的權限之修改的指令,如下所示:
drwx------. 6 git git 143 5月 24 08:52 git
#dir -l
drwx------. 6 git gitgroup 143 5月 24 08:52 git
# chmod -R 770 ./git
=======================================================================
========================================================================
nano
pwd 取得目前目錄名稱(有可能是連結)
pwd –P 取得正確的目錄名稱
cd
yum
rm
mkdir
cp
tail
vi
vim
systemctl (start/restart/stop)
firewall-cmd
firewall-cmd --permanent --zone=public --add-port=389/tcp
firewall-cmd --reload
wget
unzip
chown
rpm -qa |grep 'openldap*'
find / | grep slapd.conf
在 Linux 要加入帳號到現有群組,可以用 useradd 及 usermod 指令實現。useradd 在建立帳號時修改預設值,可以將帳號加到現有群組;而 usermod 就可以用作修改帳號設定,其中一樣是加入帳號加到現有群組。Linux 的群組分別有 Primary group (主要群組)及 Secondary group (額外群組)。
useradd 新增帳號時加入到現有群組,只要在 useradd 加上 -G [group-name] 就可以,例如我建立一個帳號為 phpini, 並加入 devgroup 群組,指令是這樣:
如果 getgroup 不存在,先用 groupadd 建立:
# groupadd gitgroup
然後可以用 useradd 建立帳號:
# useradd -G gitgroup wengxxxxx
如果想將帳號 wengxxxxx 的 Primary group 改為 gitgroup, 只要將 -G 改成 -g
# useradd -g gitgroup wengxxxxx
usermod 的用法跟 useradd 差不多,主要分別是 usermod 是變更帳號現有的設定,將現有帳號加入現有群組。例如將 wengxxxxx 加入 getgroup 群組,指令是這樣:
# usermod -a -G gitgroup wengxxxxx
以下是變更 wengxxxxx 帳號的 Primary group 到 gitproup
# usermod -G gitgroup wengxxxxx
========================================================================
完成docker套件的安裝之後
請下達 # systemctl start docker 命令來啟動它即可。
至於如果希望每一次CentOS系統啟動時自動執行,
請下達# systemctl enable docker 命令。
========================================================================
下面資料來源:http://linux.vbird.org/linux_basic/0210filepermission.php
如何改變檔案屬性與權限
我們現在知道檔案權限對於一個系統的安全重要性了,也知道檔案的權限對於使用者與群組的相關性, 那麼如何修改一個檔案的屬性與權限呢?又!有多少檔案的權限我們可以修改呢? 其實一個檔案的屬性與權限有很多!我們先介紹幾個常用於群組、擁有者、各種身份的權限之修改的指令,如下所示:
- chgrp :改變檔案所屬群組
- chown :改變檔案擁有者
- chmod :改變檔案的權限, SUID, SGID, SBIT等等的特性
drwx------. 6 git git 143 5月 24 08:52 git
# chgrp -R gitgroup ./git
#dir -l
drwx------. 6 git gitgroup 143 5月 24 08:52 git
# dir -l
drwxrwx---. 6 git gitgroup 143 5月 24 08:52 git
=======================================================================
- 改變權限, chmod
檔案權限的改變使用的是chmod這個指令,但是,權限的設定方法有兩種, 分別可以使用數字或者是符號來進行權限的變更。我們就來談一談:
- 數字類型改變檔案權限
Linux檔案的基本權限就有九個,分別是owner/group/others三種身份各有自己的read/write/execute權限, 先複習一下剛剛上面提到的資料:檔案的權限字元為:『-rwxrwxrwx』, 這九個權限是三個三個一組的!其中,我們可以使用數字來代表各個權限,各權限的分數對照表如下:r:4
每種身份(owner/group/others)各自的三個權限(r/w/x)分數是需要累加的,例如當權限為: [-rwxrwx---] 分數則是:
w:2
x:1owner = rwx = 4+2+1 = 7
所以等一下我們設定權限的變更時,該檔案的權限數字就是770啦!變更權限的指令chmod的語法是這樣的:
group = rwx = 4+2+1 = 7
others= --- = 0+0+0 = 0
舉例來說,如果要將.bashrc這個檔案所有的權限都設定啟用,那麼就下達:[root@study ~]# chmod [-R] xyz 檔案或目錄 選項與參數: xyz : 就是剛剛提到的數字類型的權限屬性,為 rwx 屬性數值的相加。 -R : 進行遞迴(recursive)的持續變更,亦即連同次目錄下的所有檔案都會變更
那如果要將權限變成『 -rwxr-xr-- 』呢?那麼權限的分數就成為 [4+2+1][4+0+1][4+0+0]=754 囉!所以你需要下達『 chmod 754 filename』。 另外,在實際的系統運作中最常發生的一個問題就是,常常我們以vim編輯一個shell的文字批次檔後,他的權限通常是 -rw-rw-r-- 也就是664, 如果要將該檔案變成可執行檔,並且不要讓其他人修改此一檔案的話, 那麼就需要-rwxr-xr-x這樣的權限,此時就得要下達:『 chmod 755 test.sh 』的指令囉![root@study ~]# ls -al .bashrc -rw-r--r--. 1 root root 176 Dec 29 2013 .bashrc [root@study ~]# chmod 777 .bashrc [root@study ~]# ls -al .bashrc -rwxrwxrwx. 1 root root 176 Dec 29 2013 .bashrc
另外,如果有些檔案你不希望被其他人看到,那麼應該將檔案的權限設定為例如:『-rwxr-----』,那就下達『 chmod 740 filename 』吧!例題: 將剛剛你的.bashrc這個檔案的權限修改回-rw-r--r--的情況吧!答:-rw-r--r--的分數是644,所以指令為:
chmod 644 .bashrc - 符號類型改變檔案權限
還有一個改變權限的方法呦!從之前的介紹中我們可以發現,基本上就九個權限分別是(1)user (2)group (3)others三種身份啦!那麼我們就可以藉由u, g, o來代表三種身份的權限!此外, a 則代表 all 亦即全部的身份!那麼讀寫的權限就可以寫成r, w, x囉!也就是可以使用底下的方式來看:chmod u
g
o
a+(加入)
-(除去)
=(設定)r
w
x檔案或目錄
來實作一下吧!假如我們要『設定』一個檔案的權限成為『-rwxr-xr-x』時,基本上就是:- user (u):具有可讀、可寫、可執行的權限;
- group 與 others (g/o):具有可讀與執行的權限。
所以就是:
那麼假如是『 -rwxr-xr-- 』這樣的權限呢?可以使用『 chmod u=rwx,g=rx,o=r filename 』來設定。此外,如果我不知道原先的檔案屬性,而我只想要增加.bashrc這個檔案的每個人均可寫入的權限, 那麼我就可以使用:[root@study ~]# chmod u=rwx,go=rx .bashrc # 注意喔!那個 u=rwx,go=rx 是連在一起的,中間並沒有任何空白字元! [root@study ~]# ls -al .bashrc -rwxr-xr-x. 1 root root 176 Dec 29 2013 .bashrc
而如果是要將權限去掉而不更動其他已存在的權限呢?例如要拿掉全部人的可執行權限,則:[root@study ~]# ls -al .bashrc -rwxr-xr-x. 1 root root 176 Dec 29 2013 .bashrc [root@study ~]# chmod a+w .bashrc [root@study ~]# ls -al .bashrc -rwxrwxrwx. 1 root root 176 Dec 29 2013 .bashrc
知道 +, -, = 的不同點了嗎?對啦! + 與 – 的狀態下,只要是沒有指定到的項目,則該權限『不會被變動』, 例如上面的例子中,由於僅以 – 拿掉 x 則其他兩個保持當時的值不變!多多實作一下,你就會知道如何改變權限囉! 這在某些情況底下很好用的~舉例來說,你想要教一個朋友如何讓一個程式可以擁有執行的權限, 但你又不知道該檔案原本的權限為何,此時,利用『chmod a+x filename』 ,就可以讓該程式擁有執行的權限了。是否很方便?[root@study ~]# chmod a-x .bashrc [root@study ~]# ls -al .bashrc -rw-rw-rw-. 1 root root 176 Dec 29 2013 .bashrc [root@study ~]# chmod 644 .bashrc # 測試完畢得要改回來喔!
========================================================================
nano
pwd 取得目前目錄名稱(有可能是連結)
pwd –P 取得正確的目錄名稱
cd
yum
rm
mkdir
cp
tail
vi
vim
systemctl (start/restart/stop)
firewall-cmd
firewall-cmd --permanent --zone=public --add-port=389/tcp
firewall-cmd --reload
wget
unzip
chown
rpm -qa |grep 'openldap*'
find / | grep slapd.conf
2017年5月23日 星期二
CentOS7 查看 Port 占用情況
幾種 CentOS7 查看 Port 被程式佔用的方法
1.netstat 指令
# netstat -tln 可以看到有哪些 IP:Port 開啟
$ netstat -tulpn | grep LISTEN 查詢 port 80 的語法:
$ netstat -tulpn | grep :80
2.lsof 指令
RHEL 及 CentOS 預設沒有安裝 lsof, 執行以下指令用 yum 安裝
# yum install lsof
安裝好後, 使用方法如下:
# lsof -i -P -n | grep LISTEN
要查看某一個 port 是否被佔用, 在 grep 後面加上 port 即可:
$ lsof -i -P -n | grep :80
3. nmap 指令
RHEL 及 CentOS 預設沒有安裝 nmap, 執行以下指令用 yum 安裝:
# yum install nmap
安裝好後, 使用方法如下:
# nmap -sT -O localhost
輸出類似這樣的結果:
Nmap scan report for localhost (127.0.0.1)
Host is up (0.00012s latency).
Other addresses for localhost (not scanned): 127.0.0.1
Not shown: 999 closed ports
PORT STATE SERVICE
3325/tcp open smtp
3380/tcp open http
1111/tcp open rpcbind
3389/tcp open ldap
3443/tcp open https
3631/tcp open ipp
33306/tcp open mysql
33389/tcp open ms-wbt-server
1.netstat 指令
# netstat -tln 可以看到有哪些 IP:Port 開啟
$ netstat -tulpn | grep LISTEN 查詢 port 80 的語法:
$ netstat -tulpn | grep :80
2.lsof 指令
RHEL 及 CentOS 預設沒有安裝 lsof, 執行以下指令用 yum 安裝
# yum install lsof
安裝好後, 使用方法如下:
# lsof -i -P -n | grep LISTEN
要查看某一個 port 是否被佔用, 在 grep 後面加上 port 即可:
$ lsof -i -P -n | grep :80
3. nmap 指令
RHEL 及 CentOS 預設沒有安裝 nmap, 執行以下指令用 yum 安裝:
# yum install nmap
安裝好後, 使用方法如下:
# nmap -sT -O localhost
輸出類似這樣的結果:
Nmap scan report for localhost (127.0.0.1)
Host is up (0.00012s latency).
Other addresses for localhost (not scanned): 127.0.0.1
Not shown: 999 closed ports
PORT STATE SERVICE
3325/tcp open smtp
3380/tcp open http
1111/tcp open rpcbind
3389/tcp open ldap
3443/tcp open https
3631/tcp open ipp
33306/tcp open mysql
33389/tcp open ms-wbt-server
excel 資料轉成 ldif 格式
table 2:(虛擬資料)
| userid | username | pwd |
| 1XXXXXX7 | 吳鳳 | 2db22x01e5375ad4dc027abbc256231c |
table 1:
C2=="dn: cn="&A2&D$2&B2&E$2&MID(B2,1,1)&F$2
**********************************************************
A2 B2 C2
D2 E2
F2
**********************************************************
1.複製A2~Axxxxx
2.貼到 notepad++中
3.利用搜尋 # 取代 (無) ~消掉 #
注意事項,每筆資料都要空一行,空行不能有空白資料,最後一行空行要刪除
參數與值中間要空一格(參數: 值)
cn: (帳號,不能為空值)
objectclass: inetOrgPerson (必備)
objectclass: top (必備)
objectclass: person (必備)
sn: (姓,不能為空值)
givenName: (名子,不能為空值)
C2=="dn: cn="&A2&D$2&B2&E$2&MID(B2,1,1)&F$2
**********************************************************
A2 B2 C2
| 1XXXXXX7 | 吳鳳 | dn:
cn=1XXXXXX7,ou=user,ou=login,dc=nttu,dc=edu,dc=tw cn: 吳鳳 objectclass: inetOrgPerson objectclass: top objectclass: person sn: 吳 userpassword: {SSHA}exxxxxxxxxxxxxxxxxxxxxxxxxxxxG/s |
D2 E2
| ,ou=user,ou=login,dc=nttu,dc=edu,dc=tw cn: |
objectclass: inetOrgPerson objectclass: top objectclass: person sn: |
F2
userpassword: {SSHA}xxxxxxxxxxxxxxxxxxxxxxxxxxxxx/s |
**********************************************************
1.複製A2~Axxxxx
2.貼到 notepad++中
3.利用搜尋 # 取代 (無) ~消掉 #
注意事項,每筆資料都要空一行,空行不能有空白資料,最後一行空行要刪除
參數與值中間要空一格(參數: 值)
cn: (帳號,不能為空值)
objectclass: inetOrgPerson (必備)
objectclass: top (必備)
objectclass: person (必備)
sn: (姓,不能為空值)
givenName: (名子,不能為空值)
CentOS 7 安裝新版 Git 2.13.0
Git:
網址:https://github.com/git/git
最新版本:https://github.com/git/git/releases (目前最新為 2.13.0)
經網路上查詢,發現 yum 的 Git 版本只有到 1.8.3.1,經安裝也確是如此,經網路上教學手動安裝,安裝過程做下列紀錄,方便以後查詢!^_^
目前 Git 官方已經更新到 2.13.0 ,所以移除原先 yum 安裝的1.8.3.1 版,手動下載 2.13.0 版,並安裝編譯。
1. 查看 yum 的 Git 信息:
# yum info git
2. 編譯依賴套件安裝
# yum install curl-devel expat-devel gettext-devel openssl-devel zlib-devel
# yum install gcc perl-ExtUtils-MakeMaker
3. 移除已安裝低版本的 Git
利用:git –-version 查看系統帶的版本,Git 版本是: 1.8.3.1,所以先要卸载低版本的 Git:
# yum remove git
4. 下载新版的 Git 原始碼包
# wget https://github.com/git/git/archive/v2.13.0.tar.gz
也可以離線下載,再傳到 CentOS7 系统中指定的目錄下面。
5. 解壓縮到指定的目錄 (git-2.13.0)
# tar -xzvf v2.13.0.tar.gz
6. 安裝 Git
分別執行以下命令進行編譯安裝,編譯過程有點久,要耐心等候完成。
# cd git-2.13.0
# make prefix=/usr/local/git all
# make prefix=/usr/local/git install
7. 添加到環境變數
# echo "export PATH=$PATH:/usr/local/git/bin" >> /etc/bashrc
# source /etc/bashrc # 立刻生效
8. 檢查 Git 版本號碼
# git --version
git version 2.13.0
安裝到這裡,目前 CentOS7 已經安裝上了最新的 Git 版本。
網址:https://github.com/git/git
最新版本:https://github.com/git/git/releases (目前最新為 2.13.0)
經網路上查詢,發現 yum 的 Git 版本只有到 1.8.3.1,經安裝也確是如此,經網路上教學手動安裝,安裝過程做下列紀錄,方便以後查詢!^_^
目前 Git 官方已經更新到 2.13.0 ,所以移除原先 yum 安裝的1.8.3.1 版,手動下載 2.13.0 版,並安裝編譯。
1. 查看 yum 的 Git 信息:
# yum info git
2. 編譯依賴套件安裝
# yum install curl-devel expat-devel gettext-devel openssl-devel zlib-devel
# yum install gcc perl-ExtUtils-MakeMaker
3. 移除已安裝低版本的 Git
利用:git –-version 查看系統帶的版本,Git 版本是: 1.8.3.1,所以先要卸载低版本的 Git:
# yum remove git
4. 下载新版的 Git 原始碼包
# wget https://github.com/git/git/archive/v2.13.0.tar.gz
也可以離線下載,再傳到 CentOS7 系统中指定的目錄下面。
5. 解壓縮到指定的目錄 (git-2.13.0)
# tar -xzvf v2.13.0.tar.gz
6. 安裝 Git
分別執行以下命令進行編譯安裝,編譯過程有點久,要耐心等候完成。
# cd git-2.13.0
# make prefix=/usr/local/git all
# make prefix=/usr/local/git install
7. 添加到環境變數
# echo "export PATH=$PATH:/usr/local/git/bin" >> /etc/bashrc
# source /etc/bashrc # 立刻生效
8. 檢查 Git 版本號碼
# git --version
git version 2.13.0
安裝到這裡,目前 CentOS7 已經安裝上了最新的 Git 版本。
2017年5月17日 星期三
LDAP GUI 管理介面
LDAP Server 架好了,但要用指令新增、刪除、修改,快瘋了!>_<
後來發現居然有 GUI 介面的管理程式,以下簡列,未來會補上操作介面!
一、JXplorer – A Java Ldap Browser
http://sourceforge.net/projects/jxplorer/
居然有中文管理介面,真是佛心
支援多平台(windows 10可用)

二、Ldap Admin
http://sourceforge.net/projects/ldapadmin/
只有英文
支援多平台(windows 10可用)
他這邊有一個自動幫我捉取 Base DNs 的功能,只要我們輸入 Host 的 IP 之後,就可以直接點選 "Fetch DNs" 直接幫我們找出 LDAP Server 的 Base DNs.設定完成之後還可以測試一下 "Test connection"

三、phpldapadmin (PHP)
必須在網頁端執行

目前3支程式我都有在使用,很方便!^_^
下面有空來研究
Apache Directory Project (ApacheDS) Apache 出的 LDAP 架設、管理專案
http://directory.apache.org/
後來發現居然有 GUI 介面的管理程式,以下簡列,未來會補上操作介面!
一、JXplorer – A Java Ldap Browser
http://sourceforge.net/projects/jxplorer/
居然有中文管理介面,真是佛心
支援多平台(windows 10可用)

二、Ldap Admin
http://sourceforge.net/projects/ldapadmin/
只有英文
支援多平台(windows 10可用)
他這邊有一個自動幫我捉取 Base DNs 的功能,只要我們輸入 Host 的 IP 之後,就可以直接點選 "Fetch DNs" 直接幫我們找出 LDAP Server 的 Base DNs.設定完成之後還可以測試一下 "Test connection"

三、phpldapadmin (PHP)
必須在網頁端執行
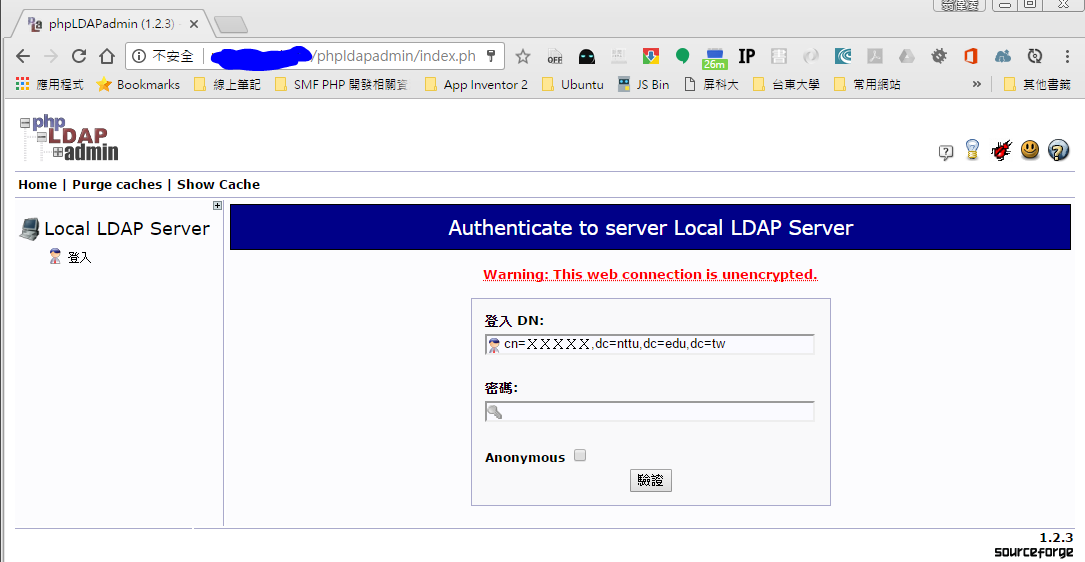
目前3支程式我都有在使用,很方便!^_^
下面有空來研究
Apache Directory Project (ApacheDS) Apache 出的 LDAP 架設、管理專案
http://directory.apache.org/
2017年5月12日 星期五
CentOS7 架設 LDAP Server 流程
弄了好幾天了,總算把LDAP Server架起來了。
網路上的講義與資料都有不同的陷阱,白忙好久。
又找不到人問~心好冷。
原來我都是在本機VM的CentOS測試,沒有DNS網域指定,一直到登入那關就卡住了。
今天一橫,把LDAP Server 改架在有DNS的主機,終於一次OK。
整理一下指令方便自己以後參考:
資料來源:臺中市105年度中小學學務系統升級暨資安建置研習手冊(沈俊達)
說明 LDAP 架構
嘗試規劃完整LDAP組織圖,這裡會說明一些LDAP的設計方式及表示法
LDAP架構圖

這裡說明一下 LDAP 主要的簡稱含義:
DIT(Directory Information Tree;目錄資訊樹)
o - organization (組織)
ou - organization unit (組織單位-部門)
c - country Name (國家)
dc - domain Component (域名)
sn - suer name (真實姓名)
cn - common name (使用者名稱)
dn - Distinguish Name (識別名稱)
修改slapd.conf
suffix "dc=mp,dc=nttu,dc=edu,dc=tw"
rootdn "cn=username,dc=mp,dc=nttu,dc=edu,dc=tw"
表示法
表示出towns在LDAP的唯一識別名稱(DN)
cn=username, cn=cy, cn=unit, cn=company, dc=mp,dc=nttu,dc=edu,dc=tw
LDAP的識別方式與DNS類似,由小排大
這個部分依照需求設定的,哆啦胖虎大的設定為一個通用的設定哦!
註:其實整個目錄樹並不一定需要這麼長,其中OU的部分只是在做組織分類,如果是一家大公司分為這麼多部門,這麼做可以清楚分類,如果只是小公司(10人以下)或是測試用,大可不設OU直接就設CN,也就是這麼設定 cn=username, dc=mp,dc=nttu,dc=edu,dc=tw,其實整個DN只要能有效區別唯一性,就可以了。
2017年5月11日 星期四
mobile 網站 CentOS7 設定過程
#yum -y update
#yum --enablerepo=extras install epel-release
#wget http://rpms.famillecollet.com/enterprise/remi-release-7.rpm
#rpm -Uvh remi-release-7*.rpm
#yum repolist
#yum install dkms
#yum install openssl openssh*
#cp /etc/ssh/sshd_config /etc/ssh/sshd_config.bak
用vim打开配置文件/etc/ssh/sshd_config
#vim /etc/ssh/sshd_config
Port 8022 // 更改 SSH Port 22 為其他 Port (防止掃瞄Port)
Protocol 2 // use Protocol 2
PermitRootLogin no // 不允許 root 登入 SSH
PermitEmptyPasswords no // 不允許空白密碼
AllowUsers sysadmin godspeed // 指定可以登入 SSH 的帳號,若有多個帳號可以登入,就用空格隔開
UseDNS no // 關閉 DNS反查 (加快登入速度)
GSSAPIAuthentication no // 關閉 IP 反查和 GSS API auth, SSH 預設連線模式會進行 IP反查及GSS API auth,所以會花掉一些時間等待查詢,很多Linux服務都會設定反查,不用特別關閉也沒關係。
#Subsystem sftp /usr/libexec/openssh/sftp-server
Subsystem sftp internal-sftp
Match Group sftponly (Group 可更改為 User 針對單一帳號)
ChrootDirectory /home/%u // 鎖定登入者家目錄
X11Forwording no
AllowTcpForwarding no
ForceCommand internal-sftp
将上图的PermitRootLogin,RSAAuthentication,PubkeyAuthentication的设置打开。
啟動SSH的服務
#systemctl start sshd.service
設置開機啟動 SSH
#systemctl enable sshd.service
設定完後要重啟 SSH 服務才會生效
#systemctl restart sshd.service (/etc/rc.d/init.d/sshd restart)
設定開機啟動 SSH
#systemctl enable sshd.service
設定防火牆
#firewall-cmd --permanent --zone=public --add-port=8022/tcp
重新載入防火牆規則
#firewall-cmd --reload
#setsebool -P nis_enabled 1
透過 netstat 指令來確認重啟後的 SSH 服務是否以 Port 8022 來接受連線
$ netstat -ant | grep :8022
SSH 可以使用 SSH -vvv 來 debug
$ ssh -vvv 192.168.1.20
安裝 PuTTY 0.69
下載:https://www.chiark.greenend.org.uk/~sgtatham/putty/latest.html
==============================================================
安裝 xrdp
#rpm -Uvh http://li.nux.ro/download/nux/dextop/el7/x86_64/nux-dextop-release-0-1.el7.nux.noarch.rpm
#yum -y install xrdp tigervnc-server
#systemctl start xrdp.service
#netstat -antup | grep xrdp
#systemctl enable xrdp.service
#firewall-cmd --permanent --zone=public --add-port=3389/tcp
#firewall-cmd --reload
===============================================================
新增使用者帳號:
#adduser username
新增使用者密碼:
#passwd username
給予使用者 sudo 權限(將使用者加入 wheel 群組):
# gpasswd -a username wheel
Adding user username to group wheel
列出 wheel 群組裡的使用者名稱與 UIDs:
# lid -g wheel
刪除使用者:
當刪除使用者時,如果只想刪除使用者,並保留使用者的檔案,輸入下列指令:
# userdel username
如果刪除使用者時,想要連同使用者的所有檔案都一併刪除,則輸入下列指令:
# userdel -r username
將使用者於群組裡移除:
# gpasswd -d username groupname
Removing user username from group groupname
#yum --enablerepo=extras install epel-release
#wget http://rpms.famillecollet.com/enterprise/remi-release-7.rpm
#rpm -Uvh remi-release-7*.rpm
#yum repolist
#yum install dkms
#yum install openssl openssh*
#cp /etc/ssh/sshd_config /etc/ssh/sshd_config.bak
用vim打开配置文件/etc/ssh/sshd_config
#vim /etc/ssh/sshd_config
Port 8022 // 更改 SSH Port 22 為其他 Port (防止掃瞄Port)
Protocol 2 // use Protocol 2
PermitRootLogin no // 不允許 root 登入 SSH
PermitEmptyPasswords no // 不允許空白密碼
AllowUsers sysadmin godspeed // 指定可以登入 SSH 的帳號,若有多個帳號可以登入,就用空格隔開
UseDNS no // 關閉 DNS反查 (加快登入速度)
GSSAPIAuthentication no // 關閉 IP 反查和 GSS API auth, SSH 預設連線模式會進行 IP反查及GSS API auth,所以會花掉一些時間等待查詢,很多Linux服務都會設定反查,不用特別關閉也沒關係。
#Subsystem sftp /usr/libexec/openssh/sftp-server
Subsystem sftp internal-sftp
Match Group sftponly (Group 可更改為 User 針對單一帳號)
ChrootDirectory /home/%u // 鎖定登入者家目錄
X11Forwording no
AllowTcpForwarding no
ForceCommand internal-sftp
将上图的PermitRootLogin,RSAAuthentication,PubkeyAuthentication的设置打开。
啟動SSH的服務
#systemctl start sshd.service
設置開機啟動 SSH
#systemctl enable sshd.service
設定完後要重啟 SSH 服務才會生效
#systemctl restart sshd.service (/etc/rc.d/init.d/sshd restart)
設定開機啟動 SSH
#systemctl enable sshd.service
設定防火牆
#firewall-cmd --permanent --zone=public --add-port=8022/tcp
重新載入防火牆規則
#firewall-cmd --reload
#setsebool -P nis_enabled 1
透過 netstat 指令來確認重啟後的 SSH 服務是否以 Port 8022 來接受連線
$ netstat -ant | grep :8022
SSH 可以使用 SSH -vvv 來 debug
$ ssh -vvv 192.168.1.20
安裝 PuTTY 0.69
下載:https://www.chiark.greenend.org.uk/~sgtatham/putty/latest.html
==============================================================
安裝 xrdp
#rpm -Uvh http://li.nux.ro/download/nux/dextop/el7/x86_64/nux-dextop-release-0-1.el7.nux.noarch.rpm
#yum -y install xrdp tigervnc-server
#systemctl start xrdp.service
#netstat -antup | grep xrdp
#systemctl enable xrdp.service
#firewall-cmd --permanent --zone=public --add-port=3389/tcp
#firewall-cmd --reload
===============================================================
新增使用者帳號:
#adduser username
新增使用者密碼:
#passwd username
給予使用者 sudo 權限(將使用者加入 wheel 群組):
# gpasswd -a username wheel
Adding user username to group wheel
列出 wheel 群組裡的使用者名稱與 UIDs:
# lid -g wheel
刪除使用者:
當刪除使用者時,如果只想刪除使用者,並保留使用者的檔案,輸入下列指令:
# userdel username
如果刪除使用者時,想要連同使用者的所有檔案都一併刪除,則輸入下列指令:
# userdel -r username
將使用者於群組裡移除:
# gpasswd -d username groupname
Removing user username from group groupname
RHEL 7 安裝 XRDP, 讓 Windows 用遠端桌面連線登入(適用於 CentOS 7)
資料來源:https://nscodes.com/install-lamp-centos-7-x-apache-php-7-x-sql-mariadb-10-x-phpmyadmin-2017/
樣品輸出

smple輸出
樣品輸出
添加以下行到info.php

smple輸出

在CentOS 7.x(Apache,PHP 7.x,SQL MariaDB 10.x,phpMyAdmin)2017上安裝LAMP
本指南介紹如何在CentOS 7系統上安裝LAMP(Linux,Apache,MySQL,PHP)堆棧。在本教程中,我將向您展示如何安裝最新版本的php(PHP 7.1),MySQL(MariaDB 10.1),phpMyAdmin(4.6.6)和Apache。本安裝指南僅適用於CentOS 7.x。
LAMP是Web服務堆棧的原型模型,被稱為原始四個開源組件的名稱的縮寫:Linux操作系統,Apache HTTP Server,MySQL關係數據庫管理系統(RDBMS)和PHP編程語言。LAMP組件在很大程度上是可互換的,不限於原始選擇。作為解決方案堆棧,LAMP適用於構建動態網站和Web應用程序。
服務器更新
1.1更新服務器
yum -y update
1.2安裝EPEL存儲庫
yum -y install epel-release
1.3。安裝REMI存儲庫
wget http://rpms.famillecollet.com/enterprise/remi-release-7.rpm
rpm -Uvh remi-release-7*.rpm
1.4。驗證EPEL Repo
yum repolist
安裝MySQL(MariaDB)服務器
2.1創建MariaDB repo
vi /etc/yum.repos.d/MariaDB.repo[mariadb]
name = MariaDB
baseurl = http://yum.mariadb.org/10.1/centos7-amd64
gpgkey=https://yum.mariadb.org/RPM-GPG-KEY-MariaDB
gpgcheck=1
2.3。啟用REMI存儲庫(更改enabled = 0 啟用= 1)
vi /etc/yum.repos.d/remi.repo樣品輸出
[remi]
name=Remis RPM repository for Enterprise Linux 7 - $basearch
#baseurl=http://rpms.remirepo.net/enterprise/7/remi/$basearch/
#mirrorlist=https://rpms.remirepo.net/enterprise/7/remi/httpsmirror
mirrorlist=http://rpms.remirepo.net/enterprise/7/remi/mirror
enabled=1
gpgcheck=1
gpgkey=file:///etc/pki/rpm-gpg/RPM-GPG-KEY-remi
2.4。安裝MySQL(MariaDB)
yum -y install mariadb-server mariadb
2.5。啟動MySQL(MariaDB)
systemctl start mariadb.service
2.6。創建MySQL(MariaDB)的系統啟動鏈接,以在系統啟動時自動啟動MySQL(MariaDB)
systemctl enable mariadb.service
2.7設置MySQL(MariaDB)root帳戶的密碼:
mysql_secure_installation
樣品輸出
# mysql_secure_installation #


NOTE: RUNNING ALL PARTS OF THIS SCRIPT IS RECOMMENDED FOR ALL MariaDB
SERVERS IN PRODUCTION USE! PLEASE READ EACH STEP CAREFULLY!

In order to log into MariaDB to secure it, well need the current
password for the root user. If youve just installed MariaDB, and
you havent set the root password yet, the password will be blank,
so you should just press enter here.

Enter current password for root (enter for none): (just press enter here)
OK, successfully used password, moving on...

Setting the root password ensures that nobody can log into the MariaDB
root user without the proper authorisation.

Set root password? [Y/n] (just press enter here)
New password: (enter new root SQL password)
Re-enter new password: (re-enter new root SQL password)
Password updated successfully!
Reloading privilege tables..
... Success!

By default, a MariaDB installation has an anonymous user, allowing anyone
to log into MariaDB without having to have a user account created for
them. This is intended only for testing, and to make the installation
go a bit smoother. You should remove them before moving into a
production environment.

Remove anonymous users? [Y/n] (just press enter here)
... Success!

Normally, root should only be allowed to connect from localhost. This
ensures that someone cannot guess at the root password from the network.

Disallow root login remotely? [Y/n] (just press enter here)
... Success!

By default, MariaDB comes with a database named test that anyone can
access. This is also intended only for testing, and should be removed
before moving into a production environment.

Remove test database and access to it? [Y/n] (just press enter here)
- Dropping test database...
... Success!
- Removing privileges on test database...
... Success!

Reloading the privilege tables will ensure that all changes made so far
will take effect immediately.

Reload privilege tables now? [Y/n] (just press enter here)
... Success!

Cleaning up...

All done! If youve completed all of the above steps, your MariaDB
installation should now be secure.

Thanks for using MariaDB!
安裝Apache Web服務器
3.1安裝Apache
yum -y install httpd
3.2啟動Apache Web服務器
systemctl start httpd.service
3.3。創建httpd的系統啟動鏈接,在系統啟動時自動啟動httpd
systemctl enable httpd.service
3.4。CentOS 7.X使用防火牆CMD,因此您必須對其進行自定義,以允許外部訪問端口80(http)和443(https)。如果你想留在IP表上,這個步驟。
systemctl start firewalld
firewall-cmd --permanent --zone=public --add-service=http
firewall-cmd --permanent --zone=public --add-service=https
firewall-cmd --reload
3.5確保Apache服務器正在運行:http://your.server.ip.adders/
PHP 7.1安裝
4.1。確保remi-php71.repo在那裡
ls /etc/yum.repos.dsmple輸出
CentOS-Base.repo       CentOS-Vault.repo      remi-php54.repo
CentOS-CR.repo         CentOS-fasttrack.repo  remi-php70.repo
CentOS-Debuginfo.repo  MariaDB.repo           remi-php71.repo
CentOS-Media.repo      epel-testing.repo      remi-safe.repo
CentOS-Sources.repo    epel.repo              remi.repo
4.2啟用php7.1的REMI存儲庫(更改enabled = 0 啟用= 1)
vi /etc/yum.repos.d/remi-php71.repo樣品輸出
[remi-php71]
name=Remis PHP 7.1 RPM repository for Enterprise Linux 7 - $basearch
#baseurl=http://rpms.remirepo.net/enterprise/7/php71/$basearch/
#mirrorlist=https://rpms.remirepo.net/enterprise/7/php71/httpsmirror
mirrorlist=http://rpms.remirepo.net/enterprise/7/php71/mirror
enabled=1
gpgcheck=1
gpgkey=file:///etc/pki/rpm-gpg/RPM-GPG-KEY-remi
4.3。安裝PHP
yum -y install php
4.4。為PHP7安裝MySQL支持
yum -y install php-mysql
4.5您可以安裝CMS系統(如WordPress,Joomla和Drupal)所需的常見PHP模塊
yum -y install php-gd php-ldap php-odbc php-pear php-xml php-xmlrpc php-mbstring php-snmp php-soap curl curl-devel
4.6。重新啟動Apache:
systemctl restart httpd.service
4.7。我們來測試一下:創建php信息文件
vi /var/www/html/info.php添加以下行到info.php
<?php
  phpinfo();
  phpinfo(INFO_MODULES);
?>
確保PHP工作,php模塊在那裡http://your.server.ip.address/info.php
phpMyAdmin安裝
5.1。安裝phpMyAdmin。phpMyAdmin是一個Web界面,您可以通過它來管理MySQL數據庫。
yum install phpMyAdmin
5.2我們更改Apache配置,以便phpMyAdmin不僅允許從localhost進行連接。
vi /etc/httpd/conf.d/phpMyAdmin.conf
添加以下行:
<Directory /usr/share/phpMyAdmin/>
        Options none
        AllowOverride Limit
        Require all granted
</Directory>
樣品輸出
# phpMyAdmin - Web based MySQL browser written in php
#
# Allows only localhost by default
#
# But allowing phpMyAdmin to anyone other than localhost should be considered
# dangerous unless properly secured by SSL


Alias /phpMyAdmin /usr/share/phpMyAdmin
Alias /phpmyadmin /usr/share/phpMyAdmin

<Directory /usr/share/phpMyAdmin/>
   AddDefaultCharset UTF-8

<IfModule mod_authz_core.c>
     # Apache 2.4
     Require local
   </IfModule>
   <IfModule !mod_authz_core.c>
     # Apache 2.2
     Order Deny,Allow
     Deny from All
     Allow from 127.0.0.1
     Allow from ::1
   </IfModule>
</Directory>

<Directory /usr/share/phpMyAdmin/>
        Options none
        AllowOverride Limit
        Require all granted
</Directory>
5.3將phpMyAdmin config.inc.php中的身份驗證從cookie更改為http:
vi /etc/phpMyAdmin/config.inc.phpsmple輸出
[...]
/* Authentication type */
$cfg['Servers'][$i]['auth_type'] = 'http';
/* Server parameters */
[...]
5.4重新啟動Apache:
systemctl restart httpd.service
5.5確保phpMyAdmin工作。轉到http://your.server.ip.address/phpmyadmin/
登錄名:root,密碼在步驟2.7中添加的內容
登錄名:root,密碼在步驟2.7中添加的內容
恭喜,你完成了!🙂
使用的來源:
https : //www.apache.org/
http://php.net/
https://www.phpmyadmin.net/
https://mariadb.org/
https : //www.apache.org/
http://php.net/
https://www.phpmyadmin.net/
https://mariadb.org/
2017年5月10日 星期三
Install LAMP on CentOS 7.x (Apache, PHP 7.x, SQL MariaDB 10.x, phpMyAdmin) 2017
資料來源:https://nscodes.com/install-lamp-centos-7-x-apache-php-7-x-sql-mariadb-10-x-phpmyadmin-2017/
樣品輸出
smple輸出
樣品輸出
添加以下行到info.php
smple輸出
本指南介紹如何在CentOS 7系統上安裝LAMP(Linux,Apache,MySQL,PHP)堆棧。在本教程中,我將向您展示如何安裝最新版本的php(PHP 7.1),MySQL(MariaDB 10.1),phpMyAdmin(4.6.6)和Apache。本安裝指南僅適用於CentOS 7.x。
LAMP是Web服務堆棧的原型模型,被稱為原始四個開源組件的名稱的縮寫:Linux操作系統,Apache HTTP Server,MySQL關係數據庫管理系統(RDBMS)和PHP編程語言。LAMP組件在很大程度上是可互換的,不限於原始選擇。作為解決方案堆棧,LAMP適用於構建動態網站和Web應用程序。
服務器更新
1.1更新服務器
yum -y update
1.2安裝EPEL存儲庫
yum -y install epel-releaseyum --enablerepo=extras install epel-release
1.3。安裝REMI存儲庫
wget http://rpms.famillecollet.com/enterprise/remi-release-7.rpm
rpm -Uvh remi-release-7*.rpm
1.4。驗證EPEL Repo
yum repolist
安裝MySQL(MariaDB)服務器
2.1創建MariaDB repo
vi /etc/yum.repos.d/MariaDB.repo[mariadb]
name = MariaDB
baseurl = http://yum.mariadb.org/10.1/centos7-amd64
gpgkey=https://yum.mariadb.org/RPM-GPG-KEY-MariaDB
gpgcheck=1
2.3。啟用REMI存儲庫(更改enabled = 0 啟用= 1)
vi /etc/yum.repos.d/remi.repo樣品輸出
[remi]
name=Remis RPM repository for Enterprise Linux 7 - $basearch
#baseurl=http://rpms.remirepo.net/enterprise/7/remi/$basearch/
#mirrorlist=https://rpms.remirepo.net/enterprise/7/remi/httpsmirror
mirrorlist=http://rpms.remirepo.net/enterprise/7/remi/mirror
enabled=1
gpgcheck=1
gpgkey=file:///etc/pki/rpm-gpg/RPM-GPG-KEY-remi
2.4。安裝MySQL(MariaDB)
yum -y install mariadb-server mariadb
2.5。啟動MySQL(MariaDB)
systemctl start mariadb.service
2.6。創建MySQL(MariaDB)的系統啟動鏈接,以在系統啟動時自動啟動MySQL(MariaDB)
systemctl enable mariadb.service
2.7設置MySQL(MariaDB)root帳戶的密碼:
mysql_secure_installation
樣品輸出
# mysql_secure_installation #


NOTE: RUNNING ALL PARTS OF THIS SCRIPT IS RECOMMENDED FOR ALL MariaDB
SERVERS IN PRODUCTION USE! PLEASE READ EACH STEP CAREFULLY!

In order to log into MariaDB to secure it, well need the current
password for the root user. If youve just installed MariaDB, and
you havent set the root password yet, the password will be blank,
so you should just press enter here.

Enter current password for root (enter for none): (just press enter here)
OK, successfully used password, moving on...

Setting the root password ensures that nobody can log into the MariaDB
root user without the proper authorisation.

Set root password? [Y/n] (just press enter here)
New password: (enter new root SQL password)
Re-enter new password: (re-enter new root SQL password)
Password updated successfully!
Reloading privilege tables..
... Success!

By default, a MariaDB installation has an anonymous user, allowing anyone
to log into MariaDB without having to have a user account created for
them. This is intended only for testing, and to make the installation
go a bit smoother. You should remove them before moving into a
production environment.

Remove anonymous users? [Y/n] (just press enter here)
... Success!

Normally, root should only be allowed to connect from localhost. This
ensures that someone cannot guess at the root password from the network.

Disallow root login remotely? [Y/n] (just press enter here)
... Success!

By default, MariaDB comes with a database named test that anyone can
access. This is also intended only for testing, and should be removed
before moving into a production environment.

Remove test database and access to it? [Y/n] (just press enter here)
- Dropping test database...
... Success!
- Removing privileges on test database...
... Success!

Reloading the privilege tables will ensure that all changes made so far
will take effect immediately.

Reload privilege tables now? [Y/n] (just press enter here)
... Success!

Cleaning up...

All done! If youve completed all of the above steps, your MariaDB
installation should now be secure.

Thanks for using MariaDB!
安裝Apache Web服務器
3.1安裝Apache
yum -y install httpd
3.2啟動Apache Web服務器
systemctl start httpd.service
3.3。創建httpd的系統啟動鏈接,在系統啟動時自動啟動httpd
systemctl enable httpd.service
3.4。CentOS 7.X使用防火牆CMD,因此您必須對其進行自定義,以允許外部訪問端口80(http)和443(https)。如果你想留在IP表上,這個步驟。
systemctl start firewalld
firewall-cmd --permanent --zone=public --add-service=http
firewall-cmd --permanent --zone=public --add-service=https
firewall-cmd --reload
3.5確保Apache服務器正在運行:http://your.server.ip.adders/
PHP 7.1安裝
4.1。確保remi-php71.repo在那裡
ls /etc/yum.repos.dsmple輸出
CentOS-Base.repo       CentOS-Vault.repo      remi-php54.repo
CentOS-CR.repo         CentOS-fasttrack.repo  remi-php70.repo
CentOS-Debuginfo.repo  MariaDB.repo           remi-php71.repo
CentOS-Media.repo      epel-testing.repo      remi-safe.repo
CentOS-Sources.repo    epel.repo              remi.repo
4.2啟用php7.1的REMI存儲庫(更改enabled = 0 啟用= 1)
vi /etc/yum.repos.d/remi-php71.repo樣品輸出
[remi-php71]
name=Remis PHP 7.1 RPM repository for Enterprise Linux 7 - $basearch
#baseurl=http://rpms.remirepo.net/enterprise/7/php71/$basearch/
#mirrorlist=https://rpms.remirepo.net/enterprise/7/php71/httpsmirror
mirrorlist=http://rpms.remirepo.net/enterprise/7/php71/mirror
enabled=1
gpgcheck=1
gpgkey=file:///etc/pki/rpm-gpg/RPM-GPG-KEY-remi
4.3。安裝PHP
yum -y install php
4.4。為PHP7安裝MySQL支持
yum -y install php-mysql
4.5您可以安裝CMS系統(如WordPress,Joomla和Drupal)所需的常見PHP模塊
yum -y install php-gd php-ldap php-odbc php-pear php-xml php-xmlrpc php-mbstring php-snmp php-soap curl curl-devel
4.6。重新啟動Apache:
systemctl restart httpd.service
4.7。我們來測試一下:創建php信息文件
vi /var/www/html/info.php添加以下行到info.php
<?php
  phpinfo();
  phpinfo(INFO_MODULES);
?>
確保PHP工作,php模塊在那裡http://your.server.ip.address/info.php
phpMyAdmin安裝
5.1。安裝phpMyAdmin。phpMyAdmin是一個Web界面,您可以通過它來管理MySQL數據庫。
yum install phpMyAdmin
5.2我們更改Apache配置,以便phpMyAdmin不僅允許從localhost進行連接。
vi /etc/httpd/conf.d/phpMyAdmin.conf
添加以下行:
<Directory /usr/share/phpMyAdmin/>
        Options none
        AllowOverride Limit
        Require all granted
</Directory>
樣品輸出
# phpMyAdmin - Web based MySQL browser written in php
#
# Allows only localhost by default
#
# But allowing phpMyAdmin to anyone other than localhost should be considered
# dangerous unless properly secured by SSL


Alias /phpMyAdmin /usr/share/phpMyAdmin
Alias /phpmyadmin /usr/share/phpMyAdmin

<Directory /usr/share/phpMyAdmin/>
   AddDefaultCharset UTF-8

<IfModule mod_authz_core.c>
     # Apache 2.4
     Require local
   </IfModule>
   <IfModule !mod_authz_core.c>
     # Apache 2.2
     Order Deny,Allow
     Deny from All
     Allow from 127.0.0.1
     Allow from ::1
   </IfModule>
</Directory>

<Directory /usr/share/phpMyAdmin/>
        Options none
        AllowOverride Limit
        Require all granted
</Directory>
5.3將phpMyAdmin config.inc.php中的身份驗證從cookie更改為http:
vi /etc/phpMyAdmin/config.inc.phpsmple輸出
[...]
/* Authentication type */
$cfg['Servers'][$i]['auth_type'] = 'http';
/* Server parameters */
[...]
5.4重新啟動Apache:
systemctl restart httpd.service
5.5確保phpMyAdmin工作。轉到http://your.server.ip.address/phpmyadmin/
登錄名:root,密碼在步驟2.7中添加的內容
登錄名:root,密碼在步驟2.7中添加的內容
恭喜,完成了!
使用的來源:
https : //www.apache.org/
http://php.net/
https://www.phpmyadmin.net/
https://mariadb.org/
https : //www.apache.org/
http://php.net/
https://www.phpmyadmin.net/
https://mariadb.org/
訂閱:
文章 (Atom)
-
 LDAP Server 架好了,但要用指令新增、刪除、修改,快瘋了!>_< 後來發現居然有 GUI 介面的管理程式,以下簡列,未來會補上操作介面! 一、JXplorer – A Java Ldap Browser http://sourceforge.ne...
 -
開啟(建立)檔案 fopen () :打開文件檔案或是 url 網址,如果打開失敗,函數返回 false 語法: fopen ( filename , mode , include_path , context ) 參數說明: file...
-
我在 SQL Server 2016 新增一個使用者,但我不想登入時變更密碼,並且關閉下面2個強制原則: □ 強制執行密碼原則 □ 強制執行密碼逾期 關閉時會出現下面錯誤訊息: 當MUST_CHANGE為ON時,CHECK_POLICY和CHECK_EXPIRA...